Before any of the MG21 radio work in the rest of this series was possible, the router first needed to be off its stock, ISP-controlled firmware. The W1700K ships as a locked-down Quantum Fiber appliance; getting OpenWrt onto it is a separate, much more ordinary kind of risk than the radio reverse engineering that follows — the risk here is bricking a router via a bad flash write, not silicon security analysis. It’s also the prerequisite for everything else in this series: without OpenWrt and a Linux shell, there is no way to reach /dev/ttyS1, drive GPIOs, or run any of the tooling the later chapters depend on.
This process modifies bootloader settings and erases a flash region. A wrong file, address, partition layout, or interrupted write can brick the router. Do not attempt this on leased ISP equipment you don’t own outright.
Opening the case and wiring UART
The case is held together with a single T10 Torx screw, hidden beneath the QR-code label. Inside, the UART header carries the router’s serial console at 115200 8N1, flow control disabled, in this pin order: TX, GND, VCC 3.3 V, unused, RX.
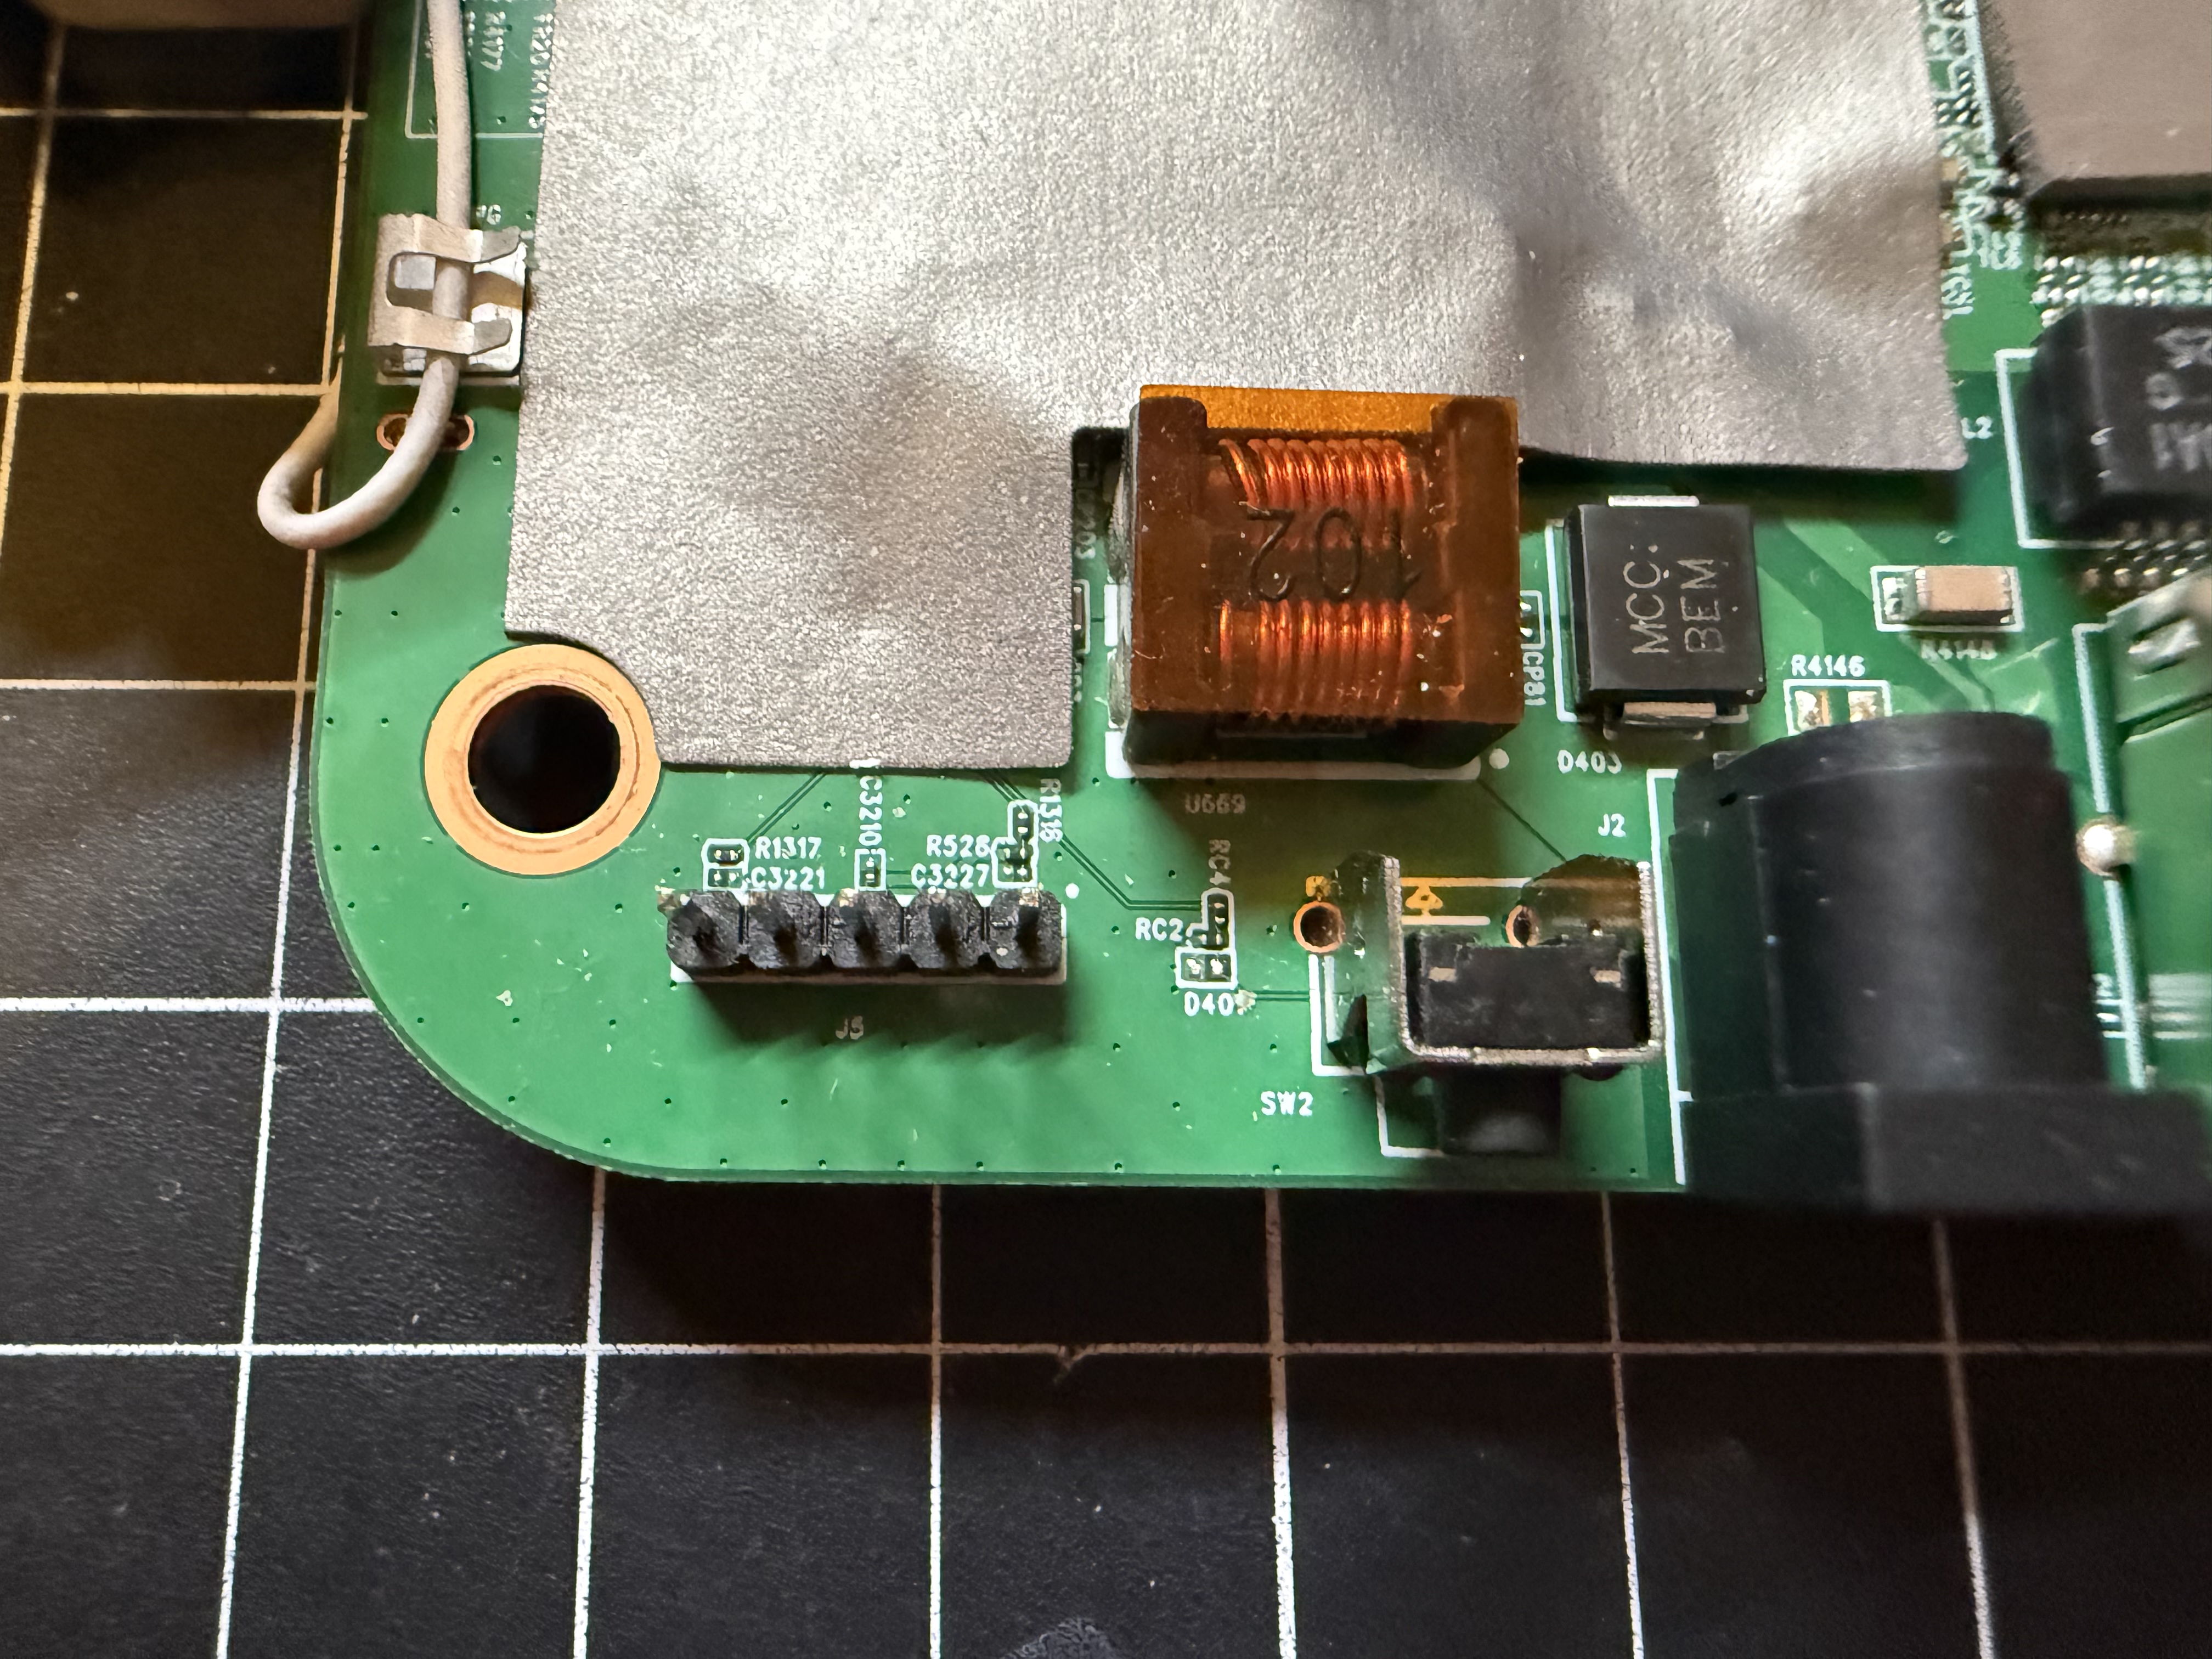
Wire a 3.3 V USB-serial adapter router-TX to adapter-RX, router-GND to adapter-GND, and router-RX to adapter-TX — the usual cross-over for a two-wire console. Do not connect the VCC pin. The router is powered normally through its own power supply; USB-serial adapters that back-feed 3.3V onto a board that’s already powered are a good way to damage something. During boot, pressing any key in the serial terminal interrupts autoboot and drops into the ECNT> U-Boot prompt.
Required files
The current installer images come from the w1700k/ubi2-installer release:
openwrt-airoha-an7581-gemtek_w1700k-ubi-chainload-uboot.itb
openwrt-airoha-an7581-gemtek_w1700k-ubi-initramfs-installer.itb
Use the current UBI2 installer specifically — older w1700k-builds-outdated images use an incompatible partition layout. The first file (the chainloader) was renamed locally to the much shorter uboot.itb, both to make it pastable fast at the U-Boot prompt and to sidestep an earlier mistake where a literal backslash got typed in front of the underscore in the original long filename (U-Boot wants the actual _ character, not a shell escape).
Setting up TFTP on the Mac
-
Connect the Mac directly to one of the router’s yellow 1 GbE ports.
-
Give the Mac’s Ethernet interface the static address
192.168.1.10/24— the router uses192.168.1.1while sitting in U-Boot. -
Put both
.itbfiles in the TFTP server’s root. macOS’s built-in TFTP service roots at/private/tftpboot(/var/tftpbootresolves to the same place); a different TFTP server may use a different root — what matters is the document root of whatever server is actually running. -
Make sure the server can read the files and that the Mac’s firewall isn’t blocking TFTP’s UDP traffic.
-
Before touching the flash, sanity-check connectivity from the
ECNT>prompt:ping 192.168.1.10A working link reports
host 192.168.1.10 is alive.
A successful ping only proves basic link and IP connectivity — it says nothing about whether a multi-block TFTP transfer will actually survive to completion, which turned out to be the real obstacle.
Why the chainload kept failing, and the fix
The naive approach — interrupt autoboot, then type out the tftpboot command by hand — reliably failed. U-Boot printed the classic timeout/retransmit pattern:
TFTP from server 192.168.1.10; our IP address is 192.168.1.1
Loading: T #T T #T ...
Retry count exceeded; starting again
T #T output means timeouts and retransmissions, not a healthy transfer in progress. The TFTP server’s own logs showed duplicate acknowledgements, duplicate requests, local UDP ports changing mid-transfer, and eventually:
TFTP error: First block is not block 1 (48)Put together, this is U-Boot issuing new read requests while older sessions from the previous failed attempt were still alive on the server side — the server ends up juggling concurrent sessions on different UDP ports, and the router receives stale, duplicate, or out-of-order blocks. Retrying again in the same boot only makes this worse, not better, because it adds yet another overlapping session.
The actual cause is upstream of any of that: the W1700K’s stock U-Boot Ethernet driver becomes unreliable quickly, and OpenWrt community reports for this device describe exactly this kind of excessive-retry behavior once tftpboot is started after sitting at the bootloader prompt for a while. The fix is to minimize time spent in that unstable state entirely — start the transfer immediately after interrupting autoboot, with the exact command already prepared and ready to paste, rather than typing it out live.
The reliable recovery cycle, used whenever an attempt failed:
- Abort the failed attempt.
- Restart the TFTP server, to clear any lingering old sessions.
- Power-cycle the router, to reset the stock Ethernet driver’s state.
- Interrupt autoboot.
- Immediately paste the prepared
tftpbootcommand — no pause at the prompt.
Using the yellow 1 GbE port specifically and a small, short-named chainloader image further reduces the variables in play. Even with all of this, the stock driver can still drop packets, and a few fresh attempts may be needed.
The working chainload procedure
With uboot.itb sitting in the TFTP root, prepare this line in advance so it can be pasted in one shot:
setenv serverip 192.168.1.10 ; setenv ipaddr 192.168.1.1 ; tftpboot 0x89000000 uboot.itb(If the original long filename is kept instead of renaming it, substitute openwrt-airoha-an7581-gemtek_w1700k-ubi-chainload-uboot.itb for uboot.itb in that command — same procedure, just more to type quickly.)
Then:
-
Start or restart the TFTP server.
-
Power-cycle the W1700K.
-
Interrupt autoboot immediately to reach
ECNT>. -
Paste the prepared command right away — do not wait several seconds at the prompt first.
-
Wait for a clean finish and confirm U-Boot actually prints
Bytes transferred = ...before doing anything else. This check matters: nothing past this point should run against a transfer that didn’t fully complete. -
Only once the transfer is confirmed, run the remaining commands from the current installer README to write the chainloader into flash:
setenv one flash read 0x600000 0x100000 \$loadaddr
setenv two "; bootm"
setenv bootcmd "$one$two"
saveenv
flash erase 0x600000 0x100000
flash write 0x600000 0x100000 0x89000000
reset
The router should come back up in the U-Boot chainloader menu.
Running the UBI2 installer
-
Keep the second image in the TFTP root under its exact expected filename, unmodified:
openwrt-airoha-an7581-gemtek_w1700k-ubi-initramfs-installer.itb -
From the chainloader’s U-Boot menu, select option 4, Boot installer via TFTP.
-
If the installer detects an existing UBI layout, it asks:
Existing UBI layout detected. Proceed and overwrite? (yes/no)Answering
yeshere is destructive — it reformats the device. That’s the expected, intended path for a first-time install. -
Let the installer run to completion without interrupting power. It migrates the flash layout and installs an initial W1700K OpenWrt build. Later OpenWrt builds can then be installed the normal way, through the standard
sysupgradepath, without repeating any of this UART/TFTP process.
What this actually verified
Confirmed working: UART console access at 115200 8N1; U-Boot successfully pinging the Mac at 192.168.1.10; the fresh-boot, immediate-command TFTP method completing cleanly; and the short renamed filename uboot.itb being accepted without issue.
Not separately verified in this pass: every stage of the UBI2 installer completing; a full boot into the final OpenWrt system with LuCI reachable; individual Wi-Fi radio or Ethernet port behavior; or whether any Quantum Fiber provisioning data survives or is lost in the process. (The rest of this series picks up from an OpenWrt system that was, in practice, fully functional — see the later chapters for the live shell, UART peripherals, and eventual reflash to an official OpenWrt snapshot build.)